Creating UI
Now that we have Fusion up and running, let's learn how to create instances from a script quickly and neatly.
Required code
1 2 | |
Instances from Code
In Fusion, you create all of your UI instances from code. That might sound counterproductive, but it will soon allow you to easily reuse your UI components and leverage powerful tools for connecting your UI and game scripts together.
To make the experience more pleasant, Fusion introduces an alternative to
Instance.new which lets you construct entire instances in one go - called the
New function.
Here's an example code snippet using New - you can compare it to Instance.new:
local myPart = New "Part" {
    Parent = workspace,

    Position = Vector3.new(1, 2, 3),
    BrickColor = BrickColor.new("Bright green"),
    Size = Vector3.new(2, 1, 4)
}
local myPart = Instance.new("Part")

myPart.Position = Vector3.new(1, 2, 3)
myPart.BrickColor = BrickColor.new("Bright green")
myPart.Size = Vector3.new(2, 1, 4)

myPart.Parent = workspace
Note
You don't need parentheses () for New - just type the class name and
properties like we did above.
In the above code snippet, the New function:
- creates a new part
- gives it a position, size and colour
- parents it to the workspace
- returns the part, so it can be stored in
myPart
The New function has many more features built in, which you'll use later, but
for now we'll just use it to set properties.
Making A ScreenGui
Let's use the New function to create a ScreenGui.
We're going to put it in our PlayerGui, so we need to import the Players
service:
1 2 3 | |
We'll also need to import New from Fusion:
1 2 3 4 5 | |
Now, we can use the New function like we did in the snippet above. We want to
create a ScreenGui with a name of 'MyFirstGui' parented to our PlayerGui.
The following code snippet does all of this for us:
1 2 3 4 5 6 7 8 9 10 11 | |
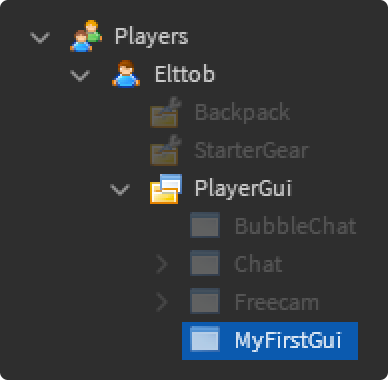
If you press 'Play', you should see that a ScreenGui has appeared in your PlayerGui, with all of the properties we've set:
Hopefully you're getting comfortable with this syntax - we'll expand on it in the next section.
Tip
Fusion automatically applies some 'sensible default' properties for
you, so you don't have to specify them. Here, ZIndexBehavior will
default to 'false' and ResetOnSpawn defaults to false.
You can see a list of all default properties here.
Adding a Child
Let's now add a TextLabel with a message and parent it to our ScreenGui.
To help with this, the New function lets us add children directly to our
instance. In order to use this feature, we first need to import Children from
Fusion:
1 2 3 4 5 6 | |
Now, we can make any instance a child of our ScreenGui - just pass it in using
[Children] as the key.
For example, here we're creating our TextLabel, and adding it as a child:
8 9 10 11 12 13 14 15 16 17 18 19 20 21 22 | |
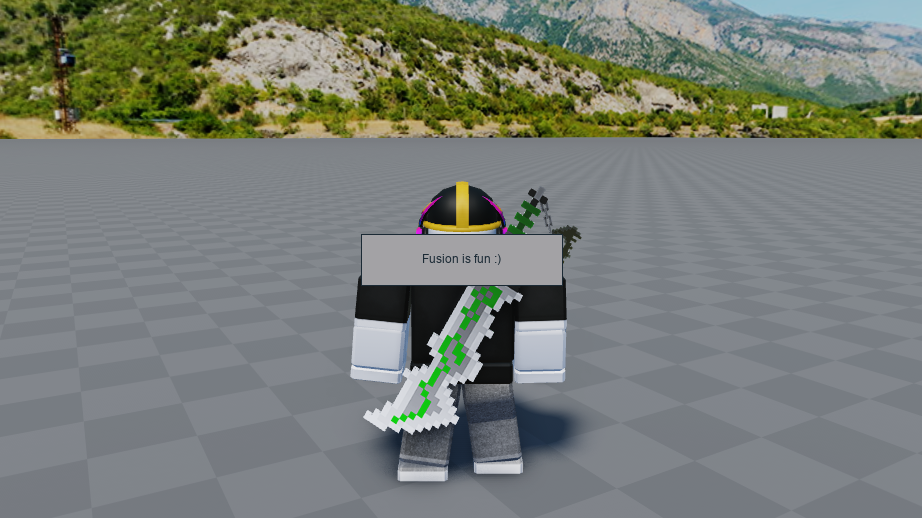
If you press 'Play' now, you should see a TextLabel in the centre of your screen:
Multiple Children
You can add more than one instance - Children supports arrays of instances.
If we wanted multiple TextLabels, we can create an array to hold our children:
8 9 10 11 12 13 14 15 16 17 18 19 20 21 22 23 24 | |
Now, we can add another TextLabel to the array, and it will also be parented:
8 9 10 11 12 13 14 15 16 17 18 19 20 21 22 23 24 25 26 27 28 29 30 31 32 | |
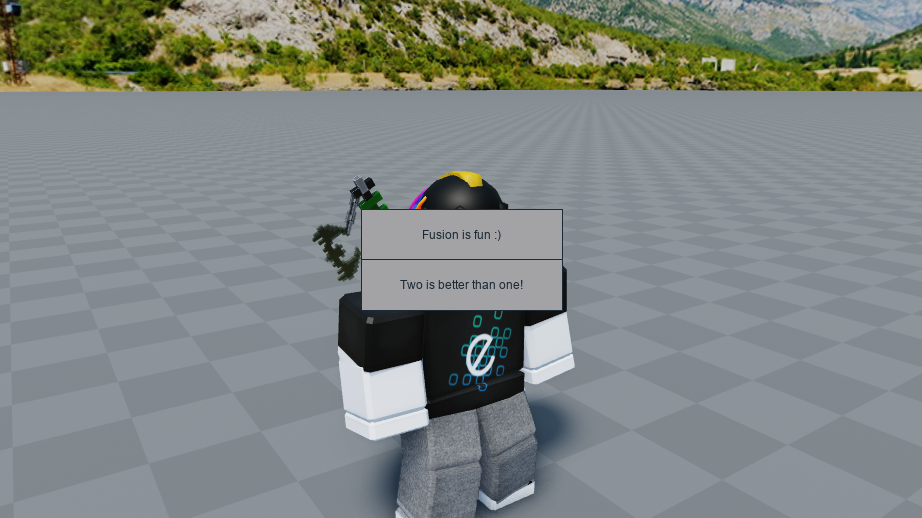
If you press 'Play', you should see both TextLabels appear:
Congratulations - you've now learned how to create simple instances with Fusion! Over the course of the next few tutorials, you'll see this syntax being used a lot, so you'll have some time to get used to it.
It's important to understand the basics of the New function, as it's used
throughout almost all Fusion code.
Finished code
1 2 3 4 5 6 7 8 9 10 11 12 13 14 15 16 17 18 19 20 21 22 23 24 25 26 27 28 29 30 31 32 | |