Get Started
Welcome to the Fusion tutorial section! Here, you'll learn how to build great interfaces with Fusion, even if you're a complete newcomer to the library.
Early Beta
Fusion is highly work-in-progress right now. There are a lot of features that don't work, aren't implemented, aren't documented fully or which may be tweaked or removed. We don't recommend using Fusion for any major project right now unless you're willing to take on the extra work of following these changes.
More stable, long-term-supported Fusion versions will be available once Fusion exits beta testing.
What You Need To Know
These tutorials assume:
- You're comfortable with Roblox and the Luau scripting language.
- These tutorials aren't an introduction to scripting! If you'd like to learn, check out the Roblox DevHub.
- You're familiar with how UI works on Roblox.
- You don't have to be a designer - knowing about UI instances, events
and data types like
UDim2andColor3will be good enough.
- You don't have to be a designer - knowing about UI instances, events
and data types like
Of course, based on your existing knowledge, you may find some tutorials easier or harder. Fusion's built to be easy to learn, but it may still take a bit of time to absorb some concepts, so don't be discouraged 🙂
How These Tutorials Work
You can find the tutorials in the navigation bar to your left. Tutorials are grouped together by category, and are designed to explore specific features of Fusion:
- 'Fundamentals' introduces the core ideas of Fusion - making instances, storing state and responding to events.
- 'Further Basics' builds on those core ideas by adding in useful utilities for building more complex UIs.
- 'Animation' demonstrates how to add tweens, transitions and spring physics to bring your UI to life.
You can either do them in order (recommended for newcomers), or you can jump to a specific tutorial for a quick refresh.
You'll also see 'projects', which combine concepts from earlier tutorials and show how they interact and work together in a real setting.
At the beginning of every tutorial, you'll see a section titled 'Required code'. They look like this - you can click to expand them:
Required code
1 2 3 4 | |
Before starting each tutorial, make sure to copy the code into your script editor, so you can follow along properly.
Similarly, you'll find the finished code for the tutorial at the end, under 'Finished code':
Finished code
1 2 3 4 5 | |
You can use the finished code as a reference if you get stuck - it'll contain the script as it appears after following all the steps of the tutorial.
Installing Fusion
Fusion is distributed as a single ModuleScript. Before starting, you'll need
to add this module script to your game. Here's how:
Fusion for Roblox Studio
If you script in Roblox Studio, here's how to install Fusion:
Steps
- Head over to Fusion's 'Releases' page. There, you can find the latest version of Fusion.
- Under 'Assets', click the
.rbxmfile to download it. This contains the Fusion module script. - In Roblox Studio, open or create a place.
- Right-click on ReplicatedStorage, and select 'Insert from File'.
- Find the
.rbxmyou just downloaded, and select it.
You should now see a ModuleScript called 'Fusion' sitting in ReplicatedStorage - you're ready to go!
Fusion for External Editors
If you use an external editor to write scripts, and synchronise them into Roblox using a plugin, here's how to install Fusion:
Steps (click to expand)
- Head over to Fusion's 'Releases' page. There, you can find the latest version of Fusion.
- Under 'Assets', click the
.zipfile to download it. Inside is a copy of the Fusion GitHub repository. - Inside the zip, copy the
srcfolder - it may be in a nested folder. - Paste
srcinto your local project, preferably in yoursharedfolder if you have one. - Rename the folder from
srctoFusion.
Once everything is set up, you should see Fusion appear in Studio when you next synchronise your project.
Setting Up A Test Script
Now that you've installed Fusion, you can set up a local script for testing. Here's how:
- Create a
LocalScriptin a service likeStarterGuiorStarterPlayerScripts. - Remove the default code, and paste the following code in:
1 2 | |
Note
This code assumes you've installed Fusion into ReplicatedStorage.
If you've installed Fusion elsewhere, you'll need to tweak the require()
to point to the correct location.
If everything was set up correctly, you can press 'Play' and everything should run without any errors.
My script doesn't work - common errors
Fusion is not a valid member of ReplicatedStorage "ReplicatedStorage"
If you're seeing this error, then your script can't find Fusion. Refer back to the previous section and double-check you've set everything up properly.
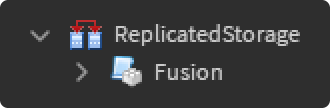
If you're using the installation guide from above, your ReplicatedStorage
should look like this:
Where To Get Help
Fusion is built to be easy to use, and we want these tutorials to be as useful and comprehensive as possible. However, maybe you're stuck on a cursed issue and really need some help; or perhaps you're looking to get a better overall understanding of Fusion!
Whatever you're looking for, here are some resources for you to get help:
- The Roblox OSS Discord has a #fusion channel
- Check out our Discussions page on GitHub
- Open an issue if you run into bugs or have feature requests